As the popularity of the discord has been increasing exponentially and discord has started to draw the attention of various communities apart from gaming. Now is a good time for you to grow on discord and establish a great community in your niche. In this post, I am going to go through best practices and tips to make a good discord server in 2021.
PART 1: 😎
Creating a Brand New Discord Server
If you are just starting to create the discord server you can check out various templates that I have mentioned in the “Create a Professional Look And Feel For Your Discord Server” Section.
Also, you can begin hassle-free with this template provided by Jagrosh, it will provide an organized channel with a description which you can edit according to your requirements.
If you want to create the server from scratch you can follow the guide below.
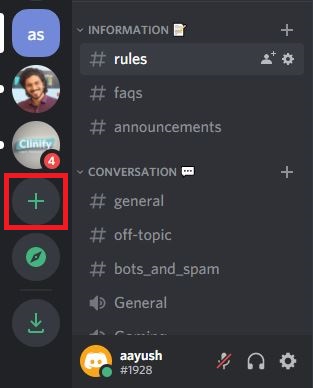
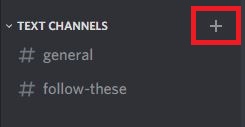
STEP 1: The first step that you have to do for creating a server in discord is to click on the ‘plus symbol’ that will be present on the top left corner.
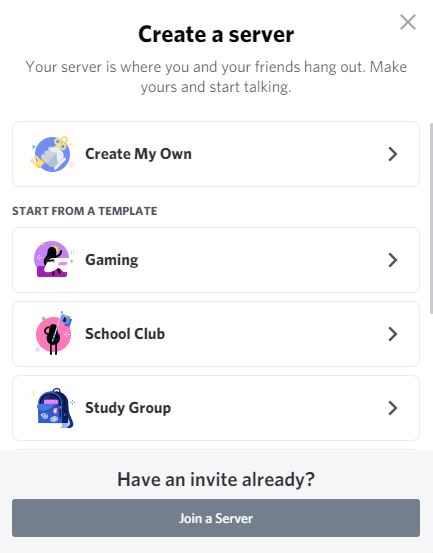
STEP 2: You will be prompted with a dialog box which will ask you to “Create My Own”, you can select this option if you want a blank server without any premade templates. The rest option will offer you theme based pre-made templates which will have different blank text and voice channels to suit the theme.
As we are creating everything from scratch therefore select the “Create My Own” option also if you want to try out premade templates you can easily follow the rest of the steps without any change.
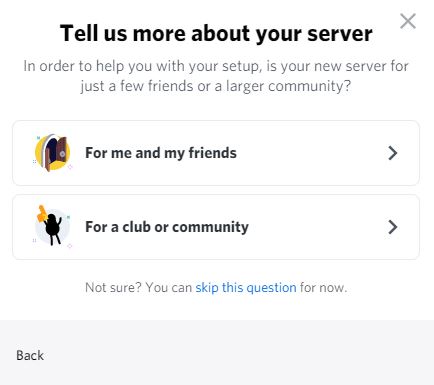
STEP 3: Then you will be prompted with a dialog box asking if the server is ‘for me and my friends’ or ‘for a club or community’. If you do for a club or community people can join without an invite e.g if someone used a server emote in another server they can click on it and it will say your server name and join the server. As our server is for a small group we will go with ‘for me and my friends’. You can also skip the option if you are not sure.
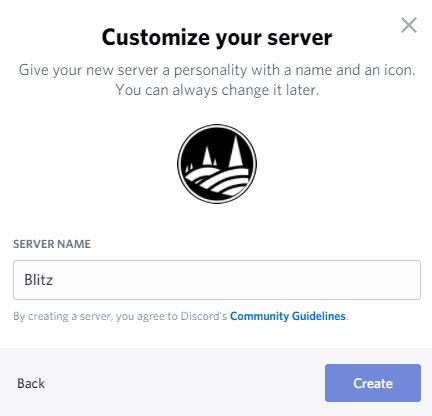
STEP 4: Provide a name and image to your server, try to keep it short and attractive as it will be the first thing that people will see on your server. You can always customize the name and image of the server later on. Click on the “Create” button.
Now you have successfully created a discord server. We will now proceed with setting up discord server’s channel and role.
Hurray!! You have successfully created your Discord Server !! Congratulations !!
Let’s Step in To Make our new server look more awesome.
PART 2: 😉
Create a Professional Look And Feel For Your Discord Server
As a server owner, you will want to create an awesome-looking discord server having a minimal and aesthetic look and feel. Your audience does not want to be invited to just some other discord server, therefore you have to differentiate your discord server from other servers. Now, in this section, I will go into detail about how you can give a professional look and feel to the server so that your server stands apart from others.
Discord Server Name & Server Logo
This advice may sound common but it is fundamental to your professional-looking discord server. Everything starts with a name, if you do not get the name right you might regret it later. The thing with the name and logo are – they are the brands in people’s minds. If you get the name right you will be able to stick in the mind of people, so next time when people type on google to search your discord server they should not get stuck with letters or confuse with other server names or logo.
Discord Server Name Tips
Keep them short – It might become hard to remember if your server name becomes big like – “Kevin and Henry Discord Server”. Try to keep them short and simple – one-word is awesome like – “Igor”, ”OwO”, ”groovy”, etc. Two words are sweet – “Hundred Monkeys” but stay away from three words and above.
Keep them catchy – Make your discord server name memorable and stick in the head of people. Do not search in google for “names of discord server” thousands of people are searching the same instead combine some unrelated ideas to name a server that people can remember.
Create a new word – There are a lot of servers’ names with no meaning but give you an absolutely amazing feeling. Combine two words in one or just put some words that sound great together.
Discord Server Logo Tips
Size & Shape – the minimum size for the server icon is 128*128 pixels. You can crop the image to circle the figure in discord itself.
There are many websites available which you can use to make logos. I used Pixlr to create my logo, it is completely free and has many advanced customizations available in the tool.
We have got lists of some quality logo maker and some completely free options too.
Discord Server Banner
The banner should match with your discord server icon and should blend with the discord theme. You can check the support page for how to create a discord banner – Server Banner Background.
NOTE: You might not be able to set the banner if you start a new discord server, as it will require 15 Server Boosts to open up the discord banner.
Start With a Cool Template
The discord template contains a list of channels that are organized properly with their categories. The discord templates are customized according to the various needs and requirements. You can find basic templates for any category such as gaming, anime, study, code, etc on this website: discord.style. I have mentioned some great templates according to the category from this website below –
| TYPE | TEMPLATE |
| Community Server | Template |
| Bot Support | Template |
| Starter Server | Template |
| Aesthetic Server | Template |
| Creator and Hobbyists | Template |
| Study Group Server | Template |
| Gaming Server | Template |
Add Emojis to the Channel
You can add emojis on each one of your voice or text channels. Emojis in the channel name provide a visual cue to the user and acts as an easy reference of what the channel is about. Also, Don’t overdo the emojis by adding many in a single channel name but keep at least one.
- Find the emoji you want in the channel name. A full list of emojis is available here: Full Emoji List.
- Copy the emoji “Browser” column. You can easily copy it from the mouse or keyboard.
- Go to your Discord server and right-click the text or voice channel where you want the emoji in the name, and then choose “Edit Channel” from the dropdown menu.
- Paste the emoji in the “Channel Name” field.
- Click “Save Changes” and you are done!
PART 3: ✍️
Setting Up Channels in Discord Server
In the Discord server, you can create many channels. To create a channel you have to click on the plus symbol right side of Category name.
There are some common channels that help users to get information about the functionality of the discord server. Some of the basic channels on the discord server include –
Rules Channel – This channel contains the information for the basic guidelines that every user should follow on your discord server.
Role-Info Channel – This channel provides information about the roles of the discord server and the criteria of the roles.
Bot-Info Channel – This channel contains information about the various bots that are installed on the server.
Announcement channel – This channel is useful to make various announcements for events on your channel.
Staff Channel – On this channel various members of the staff can have chats with one another.
Chat Channel – The channel on which users can talk to each other.
Voice Channel – In this channel you can voice chat with other users, along with this you will be able to add music bots such as groovy bot and rhythm bot on this voice channel.
These are some useful channels that will really help the users to browse around and find relevant information. You can customize the above list according to your need, a sample discord channel list for a general discord channel is provided, you can apply this basic template and then add on to it.
 ⌵ WELCOME
   # server-rules
   # server-roles
   # server-info-faq
   # staff-info

 ⌵ GENERAL
   # lobby
   # off-topic
   🔊 Voice

 ⌵ MODERATION
   # admin-room
   # moderators-room

 ⌵ Voice CHANNELS
   🔊 General
   🔊 Chat 1
   🔊 Chat 2
   🔊 Music
Organize the channels with Categories
The categories can help users to find appropriate text or voice channels, and also increases the user experience of the discord server. In the above example, I have used four categories – three for text-based channels (WELCOME, GENERAL, and MODERATION) and one for voice-based channels (VOICE CHANNELS).
Create Category – You can create a new category by right-clicking anywhere inside the server sidebar.

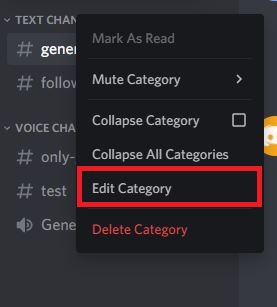
Edit Category – You can edit the categories by right-clicking on that particular channel and then you can select the edit category option.
Drag and Drop – You can move channels from one category to another category by simply dragging and dropping them.
Discord Channel #ProTips
Private Channel – You can also make categories and channels private. When you go to create a channel, just select “Private Channel” then only the roles that you want will be able to access the channel.
Channel Order – Keep the ‘rules’ or ‘info’ channels near the top; whenever someone joins the server they will see the first visible channel of the server unless the invite link points them to another channel directly.
Invites – Don’t allow people to have ‘Create Instant Invite’ permission via roles, instead you can create a manual override where you can point the user to the ‘rules’ channel whenever the user joins from the invite.
Rule Channel – The Rules Channel is very important for the discord community. You can create a read-only channel for the rules, you can follow this guide for creating a read-only rule channel. Also when you have created a Rule Channel then you have to write the rules in the channel itself for this you can use this guide: Server Rule Creation List on GitHub.
PART 4: 👍
Set Up Roles & Permission for the Discord Server
The discord offers the facility to assign roles to users. The discord roles allow the user to have specific permission. There can exist any number of roles in the discord server, each role has a different combination of permission chosen by the server administrator. When the server admin allots a role to the user then the user will inherit the permissions that have been allotted by the admin to that specific role.
The best thing about assigning roles is that you do not have to assign the same permissions manually to the members on the server. For example, you can create a moderator role and allow the role with permission to ban and mute members, now you can allot the moderator role to as many members you wish without the need for allowing the same permissions for every member.
How can you create roles and allot them permission?
First of all, you have to go to server settings – click on the drop-down arrow present beside the server name on the upper right corner and select the “Server Setting” option from the menu.
Now a window with all the server settings will come. Select the “ROLE” option from the left sidebar server setting menu.
Select the new role option present under the “ROLES” title. Also, you can create roles by selecting the “+” icon which is present on the side of the “ROLES” Title.
There are three tabs in the Edit Role – Display, Permissions, and Manage Member.
In the display tab, you have to provide the name to the new role and also you can allot cool color to that role.
Also, in the Display tab, you can select the “Display role member separately from Online Member” option which will make members in that role to be displayed separately from other members under the category name (eg. admin, moderator, etc.) of their specific Role.
In the Permission tab, there is a long list of general server permissions. The roles will be allowed permission based on options selected in this list.
The important permission that you should take care of before granting to the members will be the ability to –
- “Manage server” – Allows members to change the server name, switch region and add bots to the server.
- “Manage Channel” – Allows members to create, edit, or delete channels.
- “Manage Role” – Allows members to create, edit, delete roles lower to their highest role.
- “Kick Member” – Allows members to remove other members from the server.
- “Ban Members” – Allows members to permanently ban other members from the server.
- “Move Member” – Allows members to move other members between voice channels that the member with permission has access to.
- “Administrator” – Members with this permission have every permission and also they can bypass all channel-specific permission and restriction. You should take care before granting this permission.
In the Manage Member tab, you will be able to see all the members who have access to that specific role. Here, you can add the members in the role and also remove them from the role.
Popular Roles
The roles that have been mentioned below are the most used roles by the server owner. You can create these roles or similar roles based upon your requirement when you create the server.
Member Role – Member roles are helpful when some new user joins the discord server and you want the user to agree to a set of rules (with bot commands) or if you want to inspect the new user before letting them join the server and manually allocating them the roles. Many discord servers have the member role custom but it is recommended not to have this role on your server. You can see the reason in the ProTip Section Below.
Moderator Role – The moderator helps to manage and maintain the community server. The Moderator generally has the permission to kick, ban, or mute members that helps the moderator to manage the user. Also, the moderator has permission to manage channels and roles that helps them to make changes in the server according to need and demand in the community.
Staff Role – You can customize the staff role as per your requirement. Mostly, there can be different staff roles according to the work in the server. There can be separate staff for separate requirements in the server. The staff members have access to various private channels which are not accessible to other members in the discord server.
For any role, you will find it useful to have selected “Display role members separately from online members” in the roles which will help you to have a more organized sidebar.
Tips
You should never give more permissions to the bot than needed. This is one of the most common mistakes that is made by the server owner. When you give some permission to the bots then you permit with the bot’s token. The owner of the bot has the bot’s token which can be leaked if careless. Mostly the bot comes with a list of preset permissions when you add a bot to the server if you want to add the bot and manually give the permissions later then you can remove &permissions=NUMBERS section of the invite link. Source –
Make sure that members cannot talk in announcements, you can do this by removing the “send text-to-speech messages” option in the @everyone role.
Also, you can use various moderation bots which can act as automated moderators. Whenever someone on the discord server breaks some rules the moderation bot can put a temporary and permanent ban on the user. The moderation bot helps to maintain a quality environment within the server by handling situations before they lead to some heated debates.
Conclusion
As an owner of the discord server, setting up the permissions is one of the most important things for an owner, if not done properly can lead someone to destroy your server such as running unwanted bots. Now you have to think about what permission you want your users to have. Such as you can allow them to have more permission as they rank up, or posting emotes or images on the server, and many more. It’s upon you to decide what permission your users should have on the server.
STEP 4: 🤖
Add Bots to your Discord Server
The Bots are very useful for the server owners. The bots have various functions such as automation, moderation, automated giveaways, music bots, and many more. The bots are simple to add and they can be set up and running on the server within a few clicks.
Some bots that are highly recommended are –
MEE6 – This a moderation bot, this bot can be used to mute or kick the user on basis of the rule set up by the server owner.
GROOVY BOT – allows playing the music on the discord server including sources such as Youtube, Soundcloud, etc.
DANK MEMER – Best meme bot on discord allowing you to automatically pull memes from certain keywords.
There are a whole lot of discord bots for various functionality, you can always search for bots with specific functionalities.
STEP 5: 💪
Grow your discord server
Now once you have your server set and running then you will want the server to have more users. You can increase the number of users on your servers by advertising on other people’s servers, make sure that you have read the guidelines before advertising onto someone else channel. Also, You can bring people from other social media accounts such you can promote the channel from your Twitter or you can put down the channel name in the description of some youtube videos.
There are various discord servers where you can advertise your discord server by paying them for your post. If you opt for a paid method to grow the channel then make sure that you have targeted the right audience in your niche.
CONCLUSION
The most crucial point for making a good server is having a great look and feel which will make your channel more memorable for the users. Setting up permission and roles for the users will help you moderate your community. The Discord bots can help you automate various essential features on your channel. With keeping these tips in mind, be patient and keep growing your channel.
RESOURCES
https://gist.github.com/jagrosh/342324d7084c9ebdac2fa3d0cd759d10 – Great Guide for creating Discord Server, you can use the premade template provided by Jagrosh for fast set up of your server.
Aayush Kumar Gupta is the founder and creator of ExploringBits, a website dedicated to providing useful content for people passionate about Engineering and Technology. Aayush has completed his Bachelor of Technology (Computer Science & Engineering) from 2018-2022. From July 2022, Aayush has been working as a full-time Devops Engineer.